Theresa Costello
As one of the fellows for the Bospette Fellowship for Roman Glass at the Allard Pierson, I attempted to answer the research question: “Can Reflectance Transformation Imaging (RTI) of surface marks left on Roman vessel glass be used as a tool for documenting and studying Roman glass production?”
Many aspects of Roman glassmaking are still a mystery to us. There are Roman oil lamps which depict glassblowers at a furnace (Fig. 1)[i] and some ancient glass-making tools have been found, including iron rods, iron jacks, and terracotta moulds.[ii] Some ancient literature gives fragmentary information about the production of raw glass,[iii] but there is a considerable lack of ancient records that discuss how glass vessels were made. Most of what we know about how ancient Roman glassworkers made their wares comes from clues we can gather from the objects themselves. Specialists can study various marks left on the glass and piece together how an object was constructed. Marks on the glass left during production can include pontil marks, polish marks, tool scratches, mould seams, and signatures/maker marks. Often in literature scholars will note that there is a “pontil scar present” or the object was “made in a three-part mould” but not show what they are referring to or what exactly this evidence means.

For my research in the Allard Pierson, I wanted to find a way to document these production marks so that they can be more easily studied, categorised, and shared. Studying the production marks on an object not only contributes to our understanding of that individual object, but also by making comparisons of different marks on various vessels we can provide important information about techniques and tools widely used in ancient Roman times. We can also compare the ancient marks to marks made by glassblowers replicating Roman practices today.[iv]
While much of the physical evidence of the making process can be identified with a trained eye, oftentimes the nature of the mark (e.g. if it is very shallow) makes it difficult to photograph in normal light, especially with glass. This means that the person studying the object must hold it in their hands and rotate it around to see the marks. Reflectance Transformation Imaging (RTI) is a method which uses a set of images of one surface under different lighting directions to document the surface in more detail.[v] When multiple lighting directions are combined into one set, the user can manipulate raking light to reveal textures in the surface. RTI files can be shared with other researchers and thus minimise the amount of handling required to study the surface. While this method has been used with great success in the cultural heritage sector to investigate production marks in other materials[vi], the application of RTI to glass is rather limited due to complexities posed by the material’s reflective properties (as we also see with normal light photography). However, a proper set up can minimise the effects of reflected light.[vii]
Reflectance Transformation Imaging (RTI)
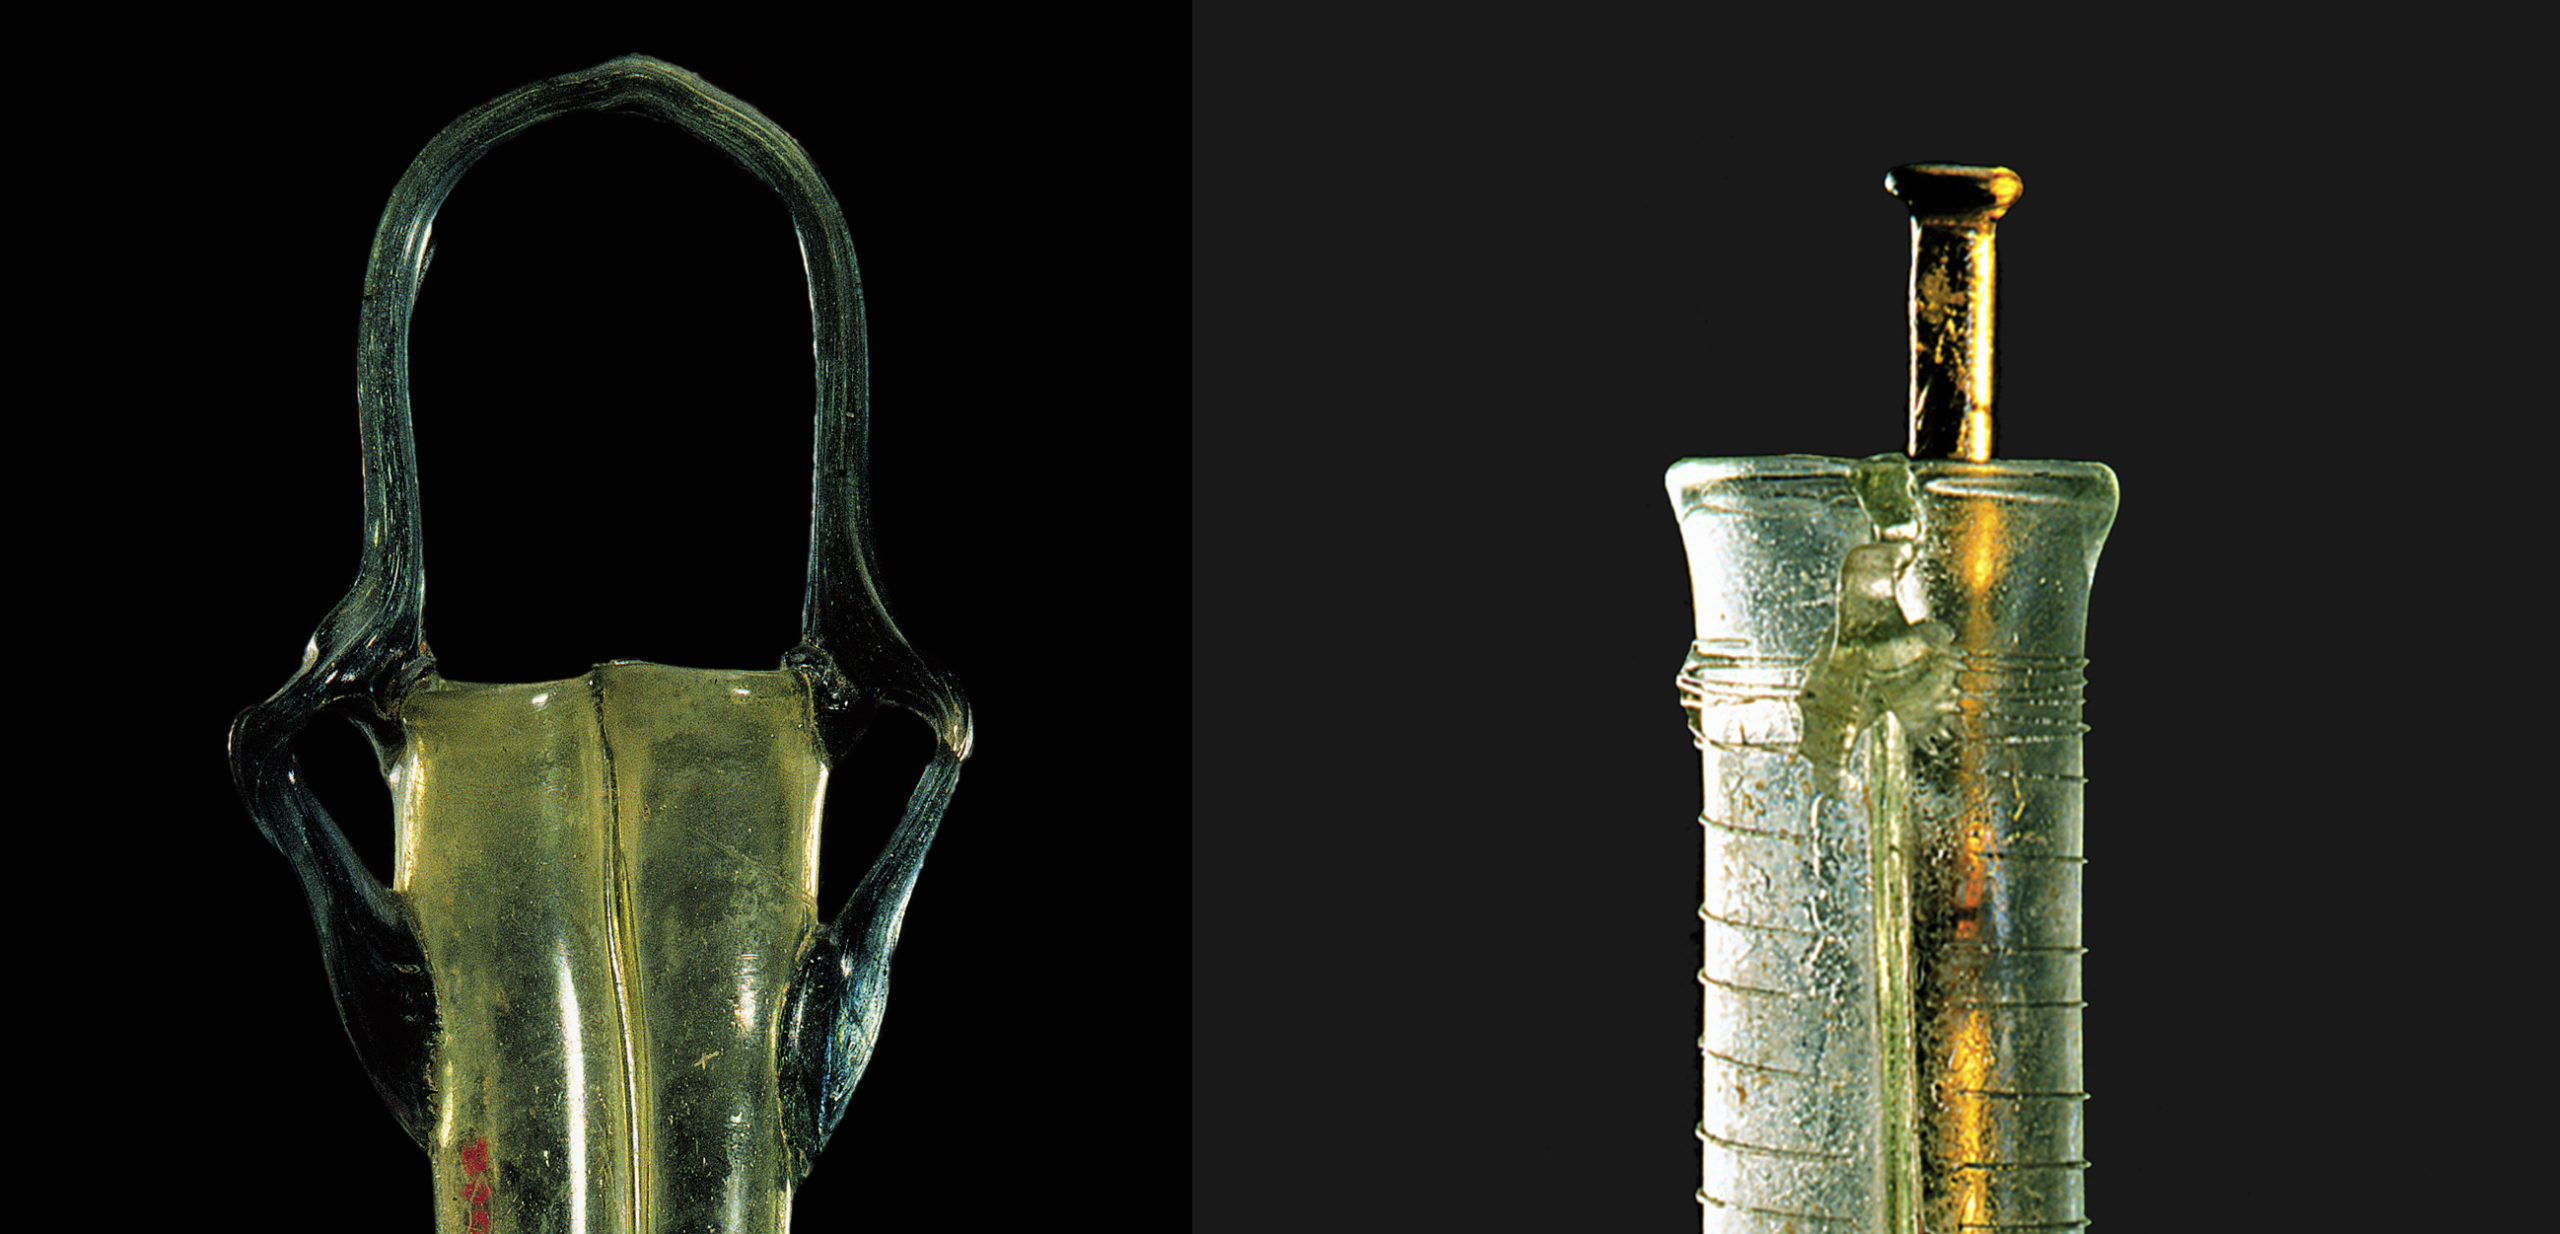
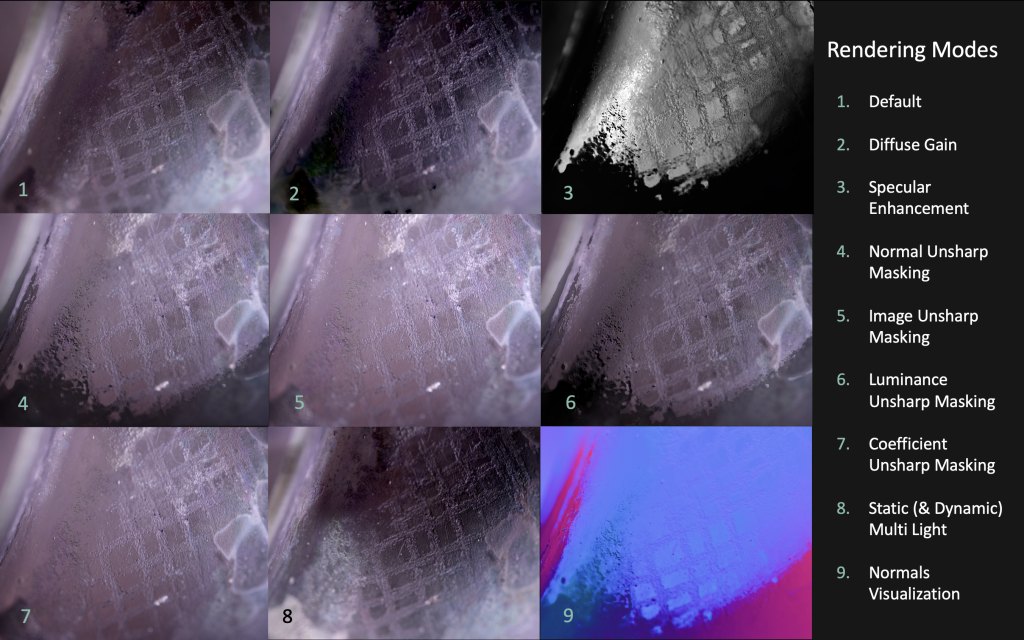
Reflectance Transformation Imaging (RTI) was first developed in 2000 under the name “Polynomial Texture Mapping”.[viii] RTI is a computational photographic method that creates a 2D mapping of the surface texture and allows you look at the surface under different lighting directions (Fig. 2). You can also select different rendering modes, where the software has done mathematical computations based on the surface images (Fig. 3).

To conduct RTI, a series of photographs are taken where the subject and camera remain still, while the direction of the light source changes for each photograph. To ensure that the light direction is equidistant each time, a dome can be used with built-in lights. Equidistant lighting yields a better outcome for the RTI calculations. A reflective ball is placed next to the object which indicates to the software where the light is coming from for each image.
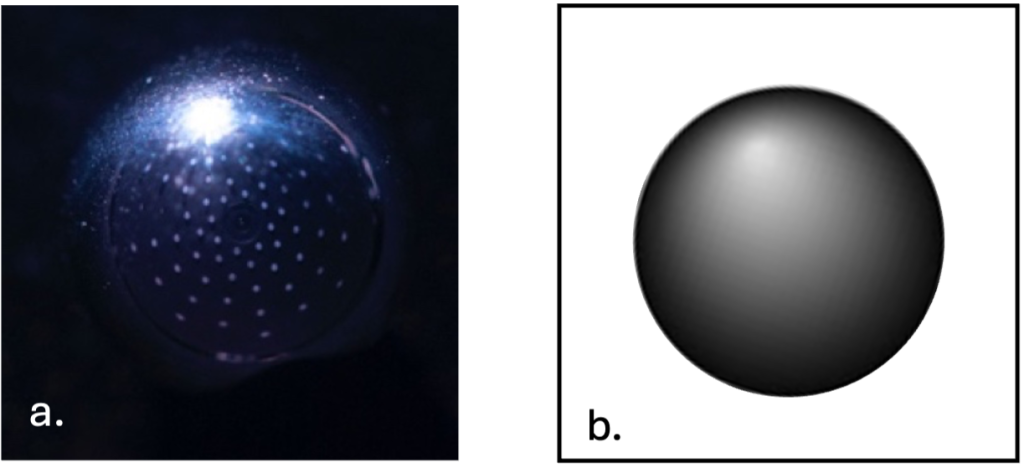
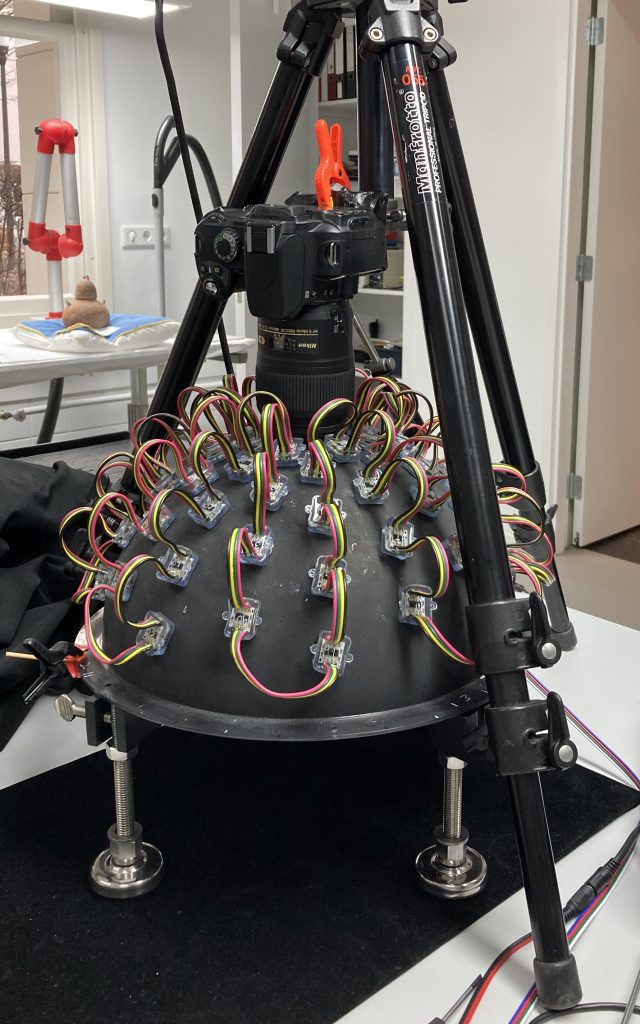
For this research, a dome with 64 built-in LED lights was used (Fig. 5). The dome was built by Julia Wagner and generously loaned by her for this project. The glass objects were placed into the dome, and underneath the object the support was covered with black felt. Since the background was black, the light was not reflected off the background surface back into the glass. A macro lens (AF-S Micro NIKKOR 60mm 1:2.8G ED) was used to get clear images of the surface marks.
Results
In total, twenty-two objects were studied. These objects were selected because they were either deemed as representative of their type or because there were questions surrounding their making process. For this blog, the results of one object, Flask APM15.753 from the Allard Pierson collection, will be presented as an example of how RTI was used to understand how the object was made.

Flask APM15.753 (Fig. 6) was chosen to be studied because it has both a pontil mark and what appears to be a ground rim. This pear shaped small flask was made around the 5th – 7th century CE and probably used for scented oil. A similar object is listed in the Corning Museum of Glass catalogue and described as having both a pontil mark and ground rim as well. Typically glasses with a pontil mark have a furnace-finished rim, as this was the reason to put an object on the pontil in the first place (see below). It was thought that perhaps at some point the flask had a furnace-finished rim, but it accidentally broke after production (either right away or much later) and the rim was levelled with polishing. However, the fact that there are multiple examples of this form with the same characteristics[ix] indicates that this style of rim was made during production. Therefore, the combination of the pontil mark and supposedly ground rim generated many questions about how the object was made.
Pontil Mark
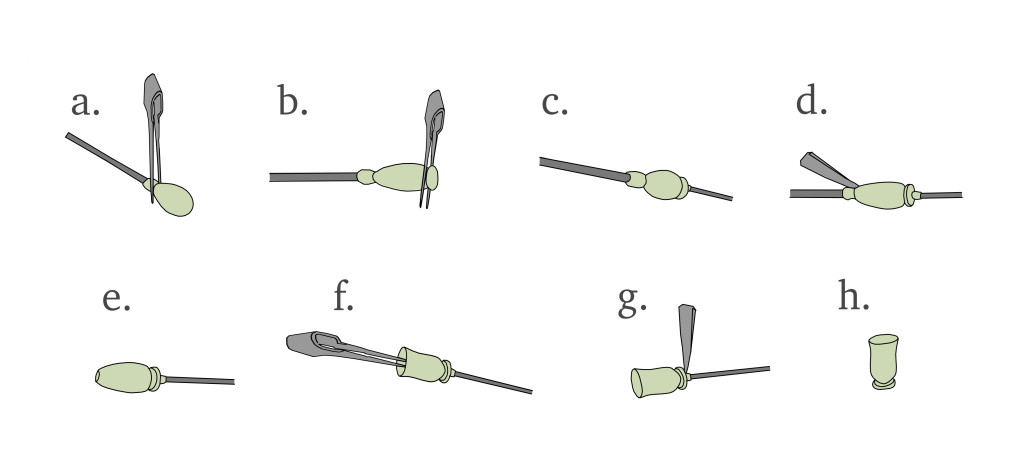
When glass is blown, only part of the object can be shaped when it is on the blowpipe. This is usually the body and bottom/foot of a vessel (Fig. 7a-b). To work on the rim/top of the object, the glass needs to be taken off the blowpipe and held in the other direction. In both Roman and modern times, a pontil rod (a solid metal rod) with a small amount of molten glass at the end of it, is often used to hold the glass so that the top can be worked. This is referred to as “transferring the glass to the pontil” (Fig. 7c-d).[x] Once on the pontil, the rim can be heated in the furnace and tooled (Fig. 7e-f). These rims are then called “furnace-finished”. When the object is completely done, it must be taken off the pontil rod. This is done in the same way as it was transferred from the blowpipe. It is “broken” or “cracked” off the pontil rod (Fig. 7g-h). This leaves a “scar” (mark) where the pontil had been attached (Fig. 8).
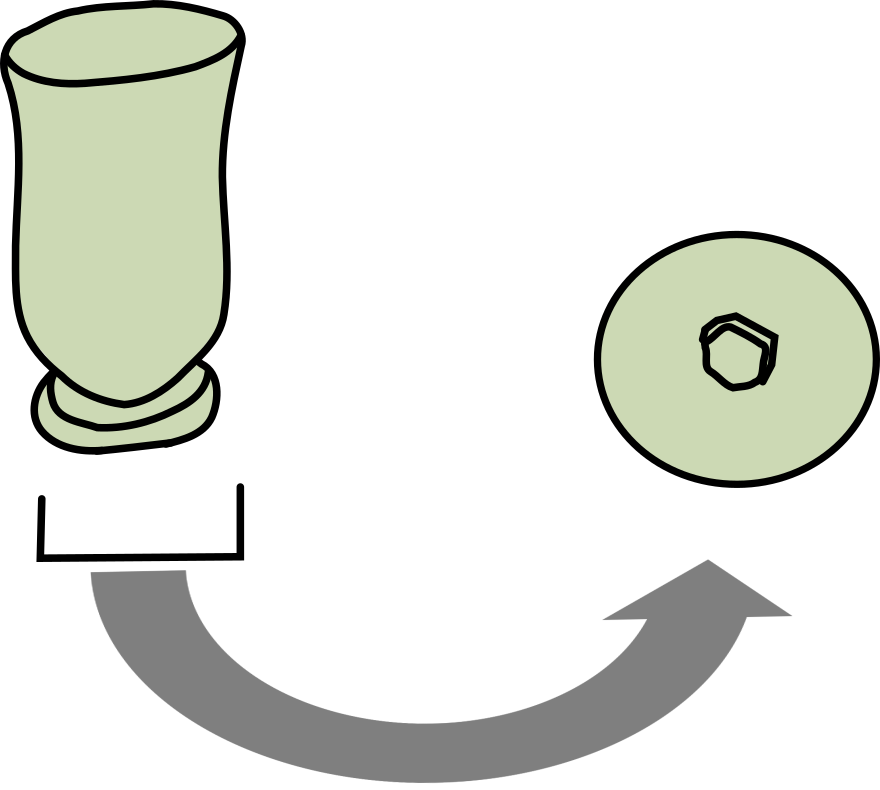
The shape of the pontil mark indicates how the object was attached to either a pontil rod or back onto the blowpipe (which was then used as a pontil rod). A singular solid mark indicates that a small gather of glass was used to hold the bottom of the object (such as in Fig. 7). For Flask APM15.753, the pontil mark is in the shape of a ring (Fig. 9). The ring pontil mark is partially missing, but the half that is still there is quite prominent.
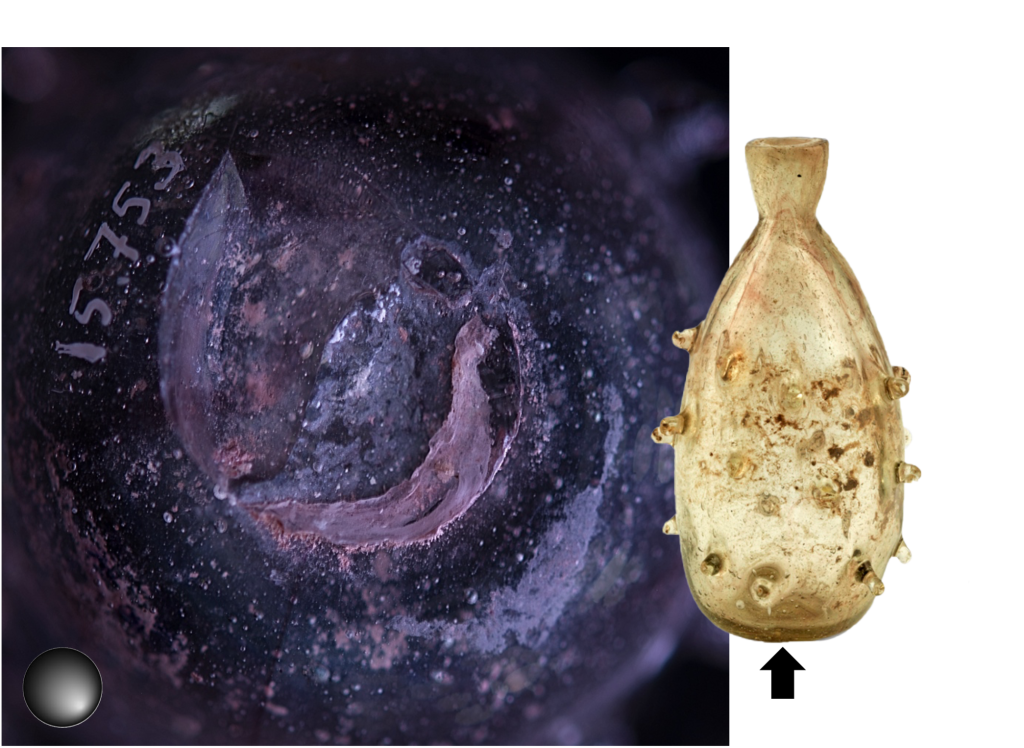
If the pontil mark is a ring, the glass was likely flipped and placed back onto the glass on the blowpipe.[xi] The presence of a ring-shaped pontil mark of Flask APM15.753 tells us that the object must have been held upside in one of these ways so that the rim could be furnace-finished. RTI shows us more of the nature of the pontil mark, including depth and sharpness.
Cracked Off Rim?
Sometimes in ancient glassblowing the glass was never transferred to a pontil or held in a clamp. These objects were only worked on the blowpipe. The bottom of the object was shaped on the blowpipe either with moulds or tools, and then the rim was finished after the glass had cooled down (annealed). These rims are called “cracked off” rims, since they were finished by cracking the glass to create a sharp, simple rim (Fig. 10).
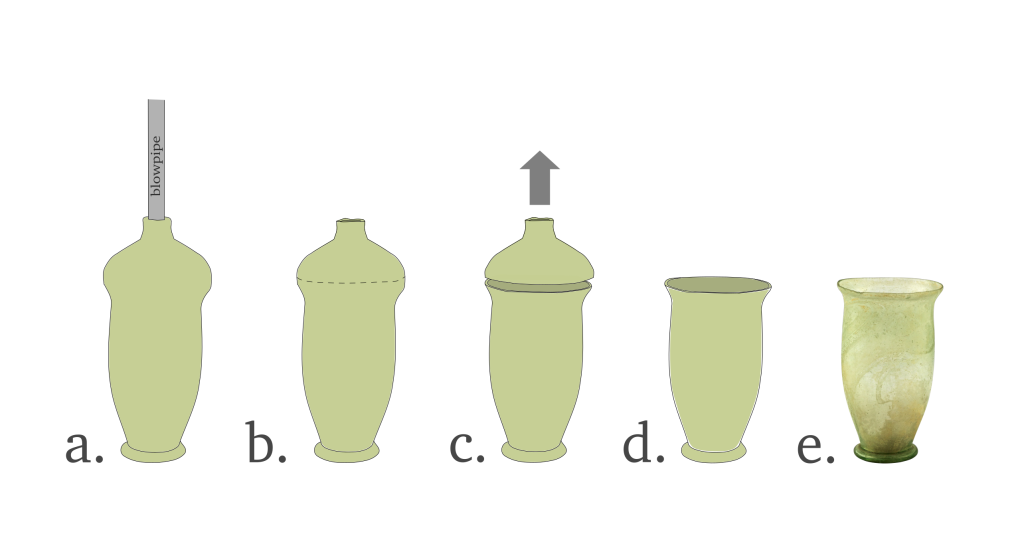
It is still not known exactly how cracked off rims were achieved in ancient times. In modern glassblowing, glass artists “hot-pop” glass by scoring the glass and then applying heat with a torch. Recently, glassblower William Gudenrath from Corning Museum of Glass has proposed that cracking off could have been accomplished by using a molten glass in a conical shape and turning the vessel inside of this cone. The hot glass simultaneously scratches the glass and heats up the exterior.[xii]
Once the glass was cracked off, it would still need to be polished before it could be used. The Romans must have used a polishing material such as a hard stone, pumice, or even grains of sand to grind the glass. Polishing marks on cracked off rims can be seen with RTI, such as with Ribbed Bowl APM1723 in the collection (Fig. 11).
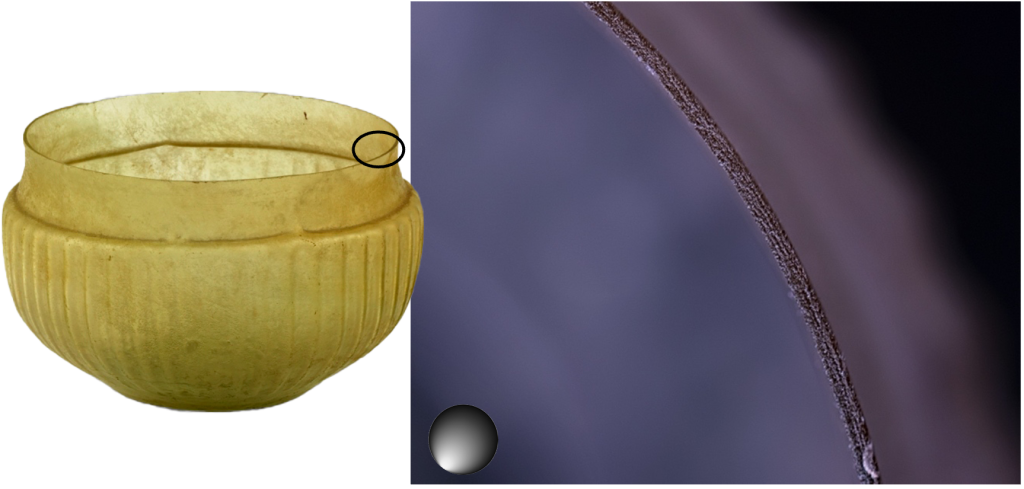
The polish marks on the rim of Ribbed Bowl APM1723 have pitting in distinct lines. The lines indicate that the rim was ground in a circular motion. This differs from the surface texture of the rim of Flask APM15.753 (Fig 12).
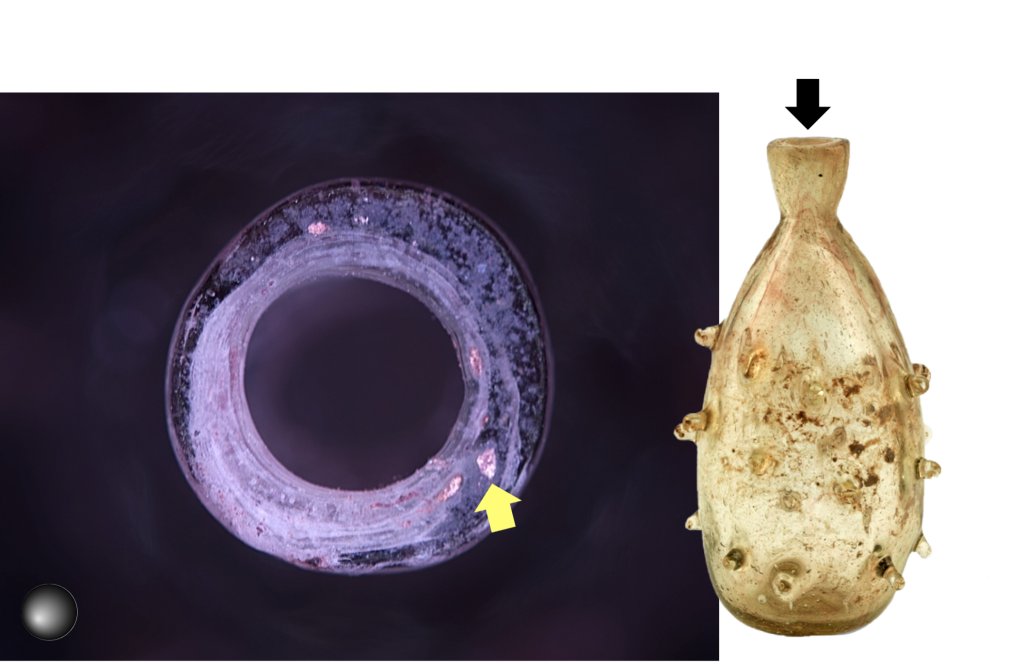
The top surface of the rim of Flask APM15.753 is flat and has pitting but has no lines like Ribbed Bowl APM1723. It does not resemble a typical cracked off and ground rim. After speaking to glassblower Durk Valkema, a possible explanation was revealed. Instead of the rim being cracked off and ground, it is possible that it was heated up while the flask was on the pontil, and then pressed onto a flat surface (a practice still used in modern glassblowing). This would explain why the rim has a texture to it, but no polish lines. There are also small inclusions that look like sand grains, which could have been on the flat surface and then stuck to the hot glass. These are difficult to see normally, but with RTI they are visible.
We now understand that the object was indeed put onto a pontil, and the rim was most likely not cracked off and ground. Instead, the rim was “furnished-finished” by heating up the rim and then flattening it. This sequence of events makes sense for fast production.
Pinched Decorations
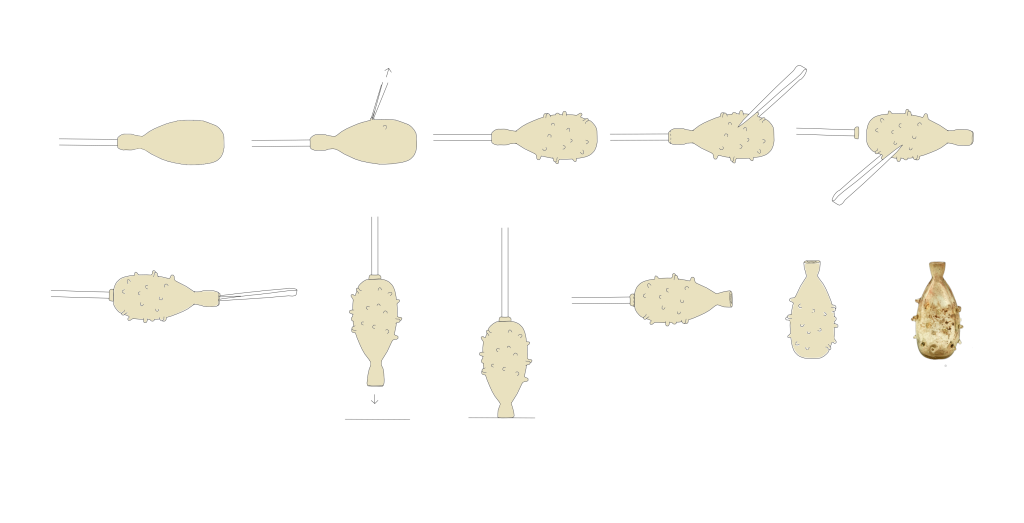
With Flask APM15.753, there were also questions on how the spiky decorations on its body were made. Was it applied in blobs or were the protrusions pinched out from the original gather glass? To determine how these spikes were made, RTI was made of the protrusions (Fig. 13).
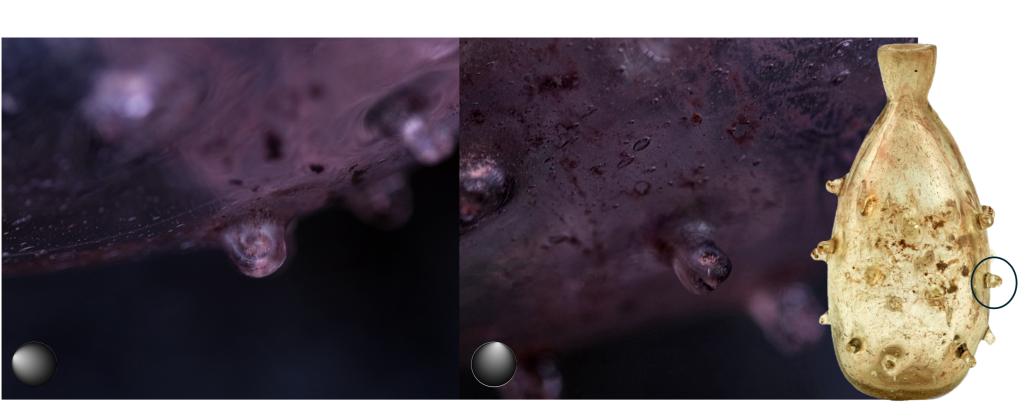
With RTI it is evident that the protrusions were made by pinching out the glass, since we can see the mark left by the tool used to grab and pull the glass.
Reconstruction
With understanding how the body, decoration, and rim were made, we can finally reconstruct the entire making process for this type of object (Fig. 14).
Conclusion
As for the question of “Can Reflectance Transformation Imaging (RTI) of surface marks left on Roman vessel glass be used as a tool for documenting and studying Roman glass production?” the answer is a resounding yes. Many of the marks that were documented with RTI were not easily seen with just normal light. While glass is a difficult material to take photographs of, the deteriorated surfaces of the Roman glass aided in the ability of RTI to capture surface textures and marks. There are still many unsolved questions about the production of Roman glass and with the RTI technique, we are taking another step towards answering them.
Next Steps
This research was a preliminary exploration into the ability of RTI to document production marks on Roman glass. The sample group was limited but yielded promising results. More Roman glass in other collections should also be studied with RTI, and the results shared and compared.
There are many modern glassblowers working in the ancient Roman way to further understand the Roman glassmaking process. Their approaches are a type of experimental archaeology. There is Mark Taylor and David Hill in the U.K., William Gudenrath in the United States, François Arnaud at the Villa Borg, and many others. The experiences of these glassblowers have already been incorporated and utilised in this research. The next step will be to conduct RTI on glasses made by modern glass artists reconstructing ancient Roman glassblowing techniques to see if modern tools and techniques are leaving similar marks as the ancient tools and techniques.
Bibliography:
Dittus, Alexander (2016), “Reflectance Transformation Imaging of Glass Objects”, Recent Advances in Glass and Ceramics Conservation 2016. Paris: ICOM-CC, 145-154.
Fleming, Stuart J. (1999) Roman Glass: Reflections on Cultural Change. The University of Pennsylvania Museum of Archaeology and Anthropology, Philadelphia.
Gudenrath, William (2024) The Techniques of Roman-Period Glassblowing. Corning Museum of Glass, Corning. https://romanglassblowing.cmog.org/
Historic England (2018) Multi-light Imaging for Cultural Heritage. Historic England, Swindon.
Lazar, Irena (2006) “An oil lamp from Slovenia depicting a Roman glass furnace”. Vjesnik: za arheologiju I povijest dalmatinsku.
Serotta, A. (2014) “An Investigation of Tool Marks on Ancient Egyptian Hard Stone Sculpture: Preliminary Report”, Metropolitan Museum of Art Studies in Science and Technology 2, 197-201.
Stern, Marianne E. (1995) Roman Mold-blown Glass: The First through Sixth Centuries. The Toledo Museum of Art, Ohio.
Stern, Marianne E. (1999) “Roman Glassblowing in a Cultural Context” American Journal of Archaeology, Jul. 1999, Vol. 103, No. 3, Archaeological Institute of America, 441-484
Stern, Marianne E. (2001) Roman, Byzantine, and Early Medieval Glass 10BCE-700CE. Ernesto Wolf Collection. Hatje Cantz Publishers, Germany.
Tait, Hugh (2012) 5000 Years of Glass. The British Museum Press, London.
[i] Split Archaeological Museum, cat. no. Fc 1094. http://avirtualmuseum.org/exhibits/fine_glassware/simplicity/unguentaria.html & Lazar (2006) “An oil lamp from Slovenia depicting a Roman glass furnace.”
[ii] Stern (1995) Roman Mold-blown Glass, 24, 41-42 & Fig. 8.
[iii] Strabo, Geography 16.2.25, Pliny the Elder, Natural History 36.65-66.
[iv] Tait (2012) 5000 Years of Glass, 237-265.
[v] https://culturalheritageimaging.org/Technologies/RTI/#examples_RTI
[vi] Serotta (2014) “An Investigation of Tool Marks on Ancient Egyptian Hard Stone Sculpture: Preliminary Report” & Historic England (2018) Multi-light Imaging for Cultural Heritage.
[vii] Dittus (2016) “Reflectance Transformation Imaging of Glass Objects”.
[viii] Historic England (2018) Multi-light Imaging for Cultural Heritage.
[ix] There is also a similar object in the Rijksmuseum van Oudheden.
[x] Gudenrath (2024) The Techniques of Roman-Period Glassblowing, chapter 1, video 10. https://romanglassblowing.cmog.org/
[xi] A ring shaped pontil mark can also indicate a round, hollow pontil was used. See Stern (1999) Roman Glassblowing in a Cultural Context, 448 & fig. 18 for an example of this shape.
[xii] Gudenrath (2024) The Techniques of Roman-Period Glassblowing, chapter 1, video 6. https://romanglassblowing.cmog.org/
